Getting started creating an adventure game
by Sean
from spookshow.studio
August 2020 Update
Creating Game Behavior
This past month I've worked on a mishmash of features, and reached the point where I can demonstrate how creating adventures in Spook Show Studio will actually look.

Grabbing an Item
A pretty common thing to do in adventure games is to grab an item and add it to your inventory. Let's create this behavior in Spook Show Studio.
The above GIF shows the end result. We want to be able to pick up the fuse sitting on top of the wooden box. If we click a second time, it should show a different message (because the fuse is gone).
Layering Images
The first step is to create the scene with two layers. The background layer
(Backg) is for everything except the interactive parts.
The fuse is layered on top of the background. Notice that turning the layer named
Fuse on and off will show or hide the layer.

Inventory Item
Next, we have to create the inventory item under the Item
tab ![]() .
.
An inventory item is just an image, along with an arrow, which determines how the mouse cursor will look when the player is using the item.
Notice that the item is named IFuse -- this has to be a different name than the
layer (Fuse).
Masking the Scene
The mask is just like another layer that goes over the scene -- except the mask is never visible to the player.
The mask is what determines the clickable areas in the scene.
In order to grab the fuse, we need to color that area of the scene a different color from everything else. In this case, I colored the clickable area a light brown.
Adding Behavior
Now we have all the ingredients -- we have a layer we can hide (named Fuse), we
have the inventory item (named IFuse), and we've masked off an area.
The last step is to combine an item with the mask color. In this case, we want the Hand + Light Brown.
In the GIF above, I already added the programming needed, so you can see the end result. If you don't fully understand it, that's okay -- I'll walk through the code. Keep in mind that computers run code from top to bottom, just like reading a story:
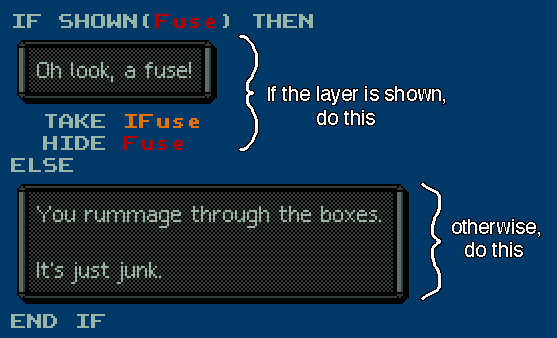
The first time the player clicks on the light brown area, the Fuse layer will
be shown. That means the computer will only run the code between the THEN and
the ELSE.
The code inside there will display the text box ("Oh look, a fuse!"), it will add the
IFuse item to the player's inventory (TAKE IFuse), and it will
hide the Fuse layer (HIDE Fuse).
If the player clicks a second time, the same code will run -- except now the
Fuse layer isn't shown. So it will instead display the text box between the
ELSE and the END IF ("You rummage...").
It's important to check if the layer is shown or not using IF SHOWN(Fuse) THEN.
If we didn't check, the player would pick up a fuse every time they clicked on the light
brown area! That might be what you want, but in this instance, we only want the player to
grab one fuse.
Programming can be scary at first, and that's okay. It can seem like magic. Just take things one step at a time, and you will get it -- it's just like following a recipe. Once you learn the individual rules, you can combine them to create something entirely new.
Thanks for following along!
It's fun to see the game come together -- hopefully you can start to see how new adventures can be created!
See you next month!
- Sean aka @velipso
Website: spookshow.studio
More Posts from Sean
© Copyright 2020 Sean Connelly (sean.fun), All Rights
Reserved
![]()